How To Guides
How to use a slate ripper

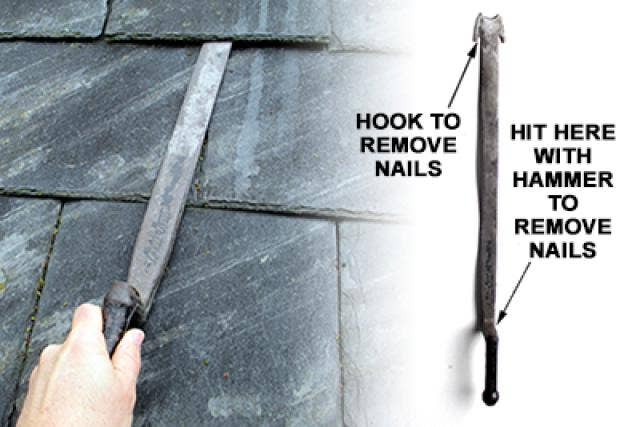
This short guide covers how to use a slate ripper - a useful tool designed for replacing slate roof tiles. Sometimes also called a slate slasher, the ripper has a thin, flat blade about two feet long, with a square, chiseled tip for and a pair of hooks cut into the side of the blade. These hooks and edges are used to chop through roofing nails, freeing the slate from the roof. The ripper has an L-shaped handle, with a steel upright with flats on it for encouraging things along with a hammer.
You’ll need some other slate roofing tools alongside the ripper:
- A simple hammer (for gentle ‘encouragement’);
- A slate cutter (for trimming replacement slates);
- And a pair of tin snips for cutting lead tags.
It’s recommended to start above where you’ve identified the leak. Slide the slate ripper tool under the slate you want to remove, and locate one of the two clouts holding the slate in place. Catch the clout in one of the hooks notched into the ripper’s blade. Applying a gentle downwards pressure on the handle, use the hammer to strike gently on the upright of the ripper. You might need multiple light strikes to cut or pull the clout, but that’s better than heavy blows which risk damaging the slates. Roofing clouts tend to be fairly soft, so it shouldn’t take much. Once you’ve cut the first nail, repeat the process on the other side.
If for some reason you can’t catch a nail with one of the hooks, you can try using the front edge of the blade, hammering the ripper gently upwards.
At this point, put some gentle pressure on the slate, sandwiching it between your hand and the blade of the slate ripper. It may require a little wiggling, but the slate should pop free with little difficulty.
When repairing slates, keep an eye out for any cracks. Even if they’re beneath other slates, the wind will blow the rain sideways, where a crack will let it seep through. Also keep an eye out for moss or shoddy repairs with silicone sealant, which can trap water under the slates. It will then build up until it starts overflowing into the roof space!
Slates are ordered by size (usually in inches). The length first, followed by the width – a fairly typical example is an 18 x 9 slate: 18 inches long, by 9 inches wide. If you can’t get the right size, you can cut down larger slates to fit. However, you should never try to use smaller ones.
Take a look at our guide on cutting slates here.
When placing a slate, the top edge should rest halfway onto the top batten, and the nail holes should sit so that your clouts will enter the middle batten just above the top edge of the row of slates below. The bottom edge should line up with the rest of the row!
When nailing the slates in, make sure you don’t hammer the clouts down tight – there should be a little room to allow for expansion and contraction with the seasons. Also make sure you’re using proper aluminium, copper or galvanised roofing clouts, sized so that they don’t exit the back of the batten.
Patching a slate roof can be a little tricky, in that half the original nail holes in the slates you’re replacing will be inaccessible. Only using one nail is generally fine – the other slates should prevent your replacements from tilting or skewing around. However, if you want to be certain, you can use a cordless drill with an HSS drill bit to place a small hole so you can put a clout into the top batten. This is also useful if the batten you’re nailing into is brittle – a pilot hole will greatly lessen the chance you might break it.
The ripper helps again when replacing the final slate. As the nail holes are entirely hidden, holding the last slate is usually done with a lead tag. When replacing one of the slates just below your final one, the nail pinning the slate in place is also used to hold a narrow strip of lead to the roof. This strip is usually about an inch wide, and dangles a couple of inches below the below the bottom edge of the row of slates that will sit on top of it.
With the tag in place you can now use the slate ripper to feel up under the line of slates for the batten. Place the slate on top of the ripper, and slide it home so that it rests on the batten with it’s bottom in line with the rest. You might need a few gentle taps with the hammer to make sure it seats properly.
Fold up the lead tag to keep the slate in place, and trim off the excess length with your tin snips. A couple of taps to make sure everything is secure and you can remove your slate ripper. Done!
If you’re in an extreme weather area with very high winds or a lot of snowfall, you may want to use something sturdier than a lead tag. Similar arrangements can be made with heavy gauge copper wire, or store-bought hooks or stainless steel clips.
Don’t worry if your replacement slates are a different shade – after a few months they will have weathered to the point where they won’t stand out at all.
You can purchase your Slate Ripper from here - Slate Ripper
Products You Will Need
Our Top Videos.

How to install a Velux Integra Electric Roof Window (5 Parts)
In this five-part guide, we take you through the full installation of a Velux GGU Centre Pivot Integra Roof Window onto an...

How to install a Duratech Centre-Pivot Pine Roof Window
Once you begin unpackaging the window, you’ll find in the box the brackets, the handle and the fixings. And there will also be some instructions...

How to install a Velux Centre-Pivot Roof Window (4 Parts)
In this four part guide, Mark Dymond – Velux Technician installs a Velux GGU Centre Pivot Roof Window onto an Interlocking Tile Roof...
Ideas & Advice
How-tos, tutorials and videos

How and why to use or snap a chalk line
Chalk lines are the fastest way to mark straight guidelines on flat surfaces. They are used extensively in the building and construction industry to speedily and accurately ‘draw’ straight lines between two points. Chalk lines are inexpensive tools...

Skylight Blinds: A Guide To The Different Types
Like many household product, blinds for skylight windows come in all shapes, sizes, and materials. Some are designed with a tangible purpose in mind, while others are more for show. One thing’s for sure - buying any type of skylight blind...