Re-Roofing: A Step by Step guide – Part 1
Part 1 - Introduction and Rafters
When it comes to the roof, the starting place is always the rafters. These are the wooden beams that run from the walls of the house to the highest point of the roof, usually called the ridgeline. The rafters are the framework of the roof and the essential element onto which your chosen roofing material is then added.

Understanding rafters and their variations is a crucial first step in the roofing process, whether you are building from scratch, re-roofing in the same style or changing the style of your roof.
Style options
If you are building the roof from scratch or considering a change from your existing style of roof, then understanding the different styles and what they offer are important. The style then leads to the kind of truss that is needed. There are many different styles of roof and levels of complexity but here are a few of the basic ones:
- A frame - A frames are tall and symmetrical frames that only need one type of rafter to be constructed
- Gabled roof - a gable is a section of the roof that extends outwards from one wall, running perpendicular to the roof
- Mansard roof - a mansard roof is created by adding an extra joint in each rafter and is used to make a living space under the roof
- Hipped roof - these roofs slope on all sides and make for a dynamic look but also need a larger number of rafters than other styles, many of them being in different sizes to account for the slope of the roof
Trusses
The style of the roof leads to the components used for the roofing truss as well as the structural design of the roof. Some of these will depend on the style you have selected but there are some variations that can be used within each category.
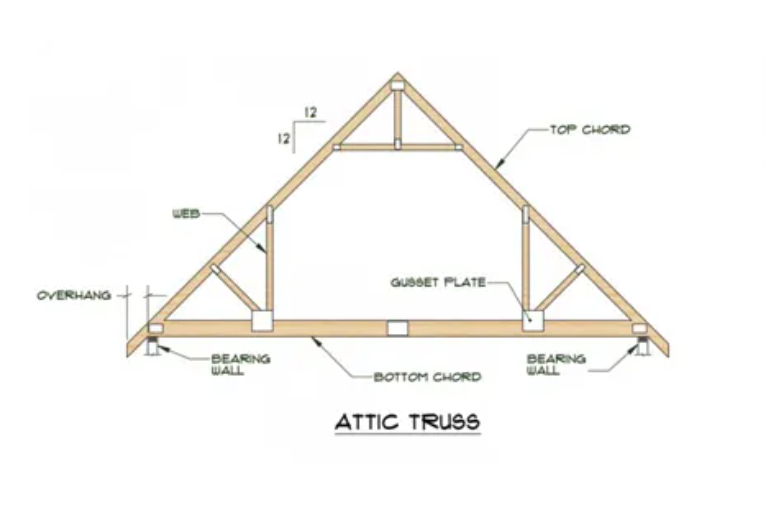
This means there are dozens of different types of trusses but the most commonly encountered include:
Fink these are the most basic form, consisting of a rafter, joist and jack support. These can be made off-site or created on-site yourself. It is also possible to have them made with 'room in attic' cutaways that transform the attic into a liveable space
Scissored these are recessed slightly in the centre of the rafter and are used in vaulted ceilings inside the house
Clerestory these are a-symmetrical where one of the joists extends beyond the rest of the rafter to allow for a wall with a window along the roof
Measuring up
It is vital when cutting your own rafters that the measuring is done with the greatest accuracy and that the size of the rafters needed is calculated before you start. The measurements needed to do this are:
- Run of each rafter this is the total length of each segment of the rafter. Generally, each truss is made from two rafters, making the width of the house the length of the run, times two
- Rise - the rise is the height of each truss which is measured from the bottom of the roof segment to the very top point of the roof, meaning it is the total roof height
- Pitch - pitch is the amount the roof will slope for every 30cm it extends horizontally. For example, a pitch of 20/30 would mean that the roof rises 20cm for every 30cm it extends
- Length of rafter segment this is the measurement taken after the others where you work out the length of each individual segment of the trusses. This depends on the design of the truss and the geometry of the previous measurements
To finish the constructions, unless you are a maths whizz, grab a calculator that can use Pythagorean formula to measure the angles necessary for the seat cuts to build the trusses. This is worked out using the run and the pitch you have already measured. However, the run needs to be adjusted by subtracting the width of the ridge beam, the centre beam that attached both the rafters and makes up the truss segment. Divide the adjusted run by two to get the actual length of the run.

On the constructions calculator you can press the €˜Run' button to input this number for further calculations. The next step is to input the pitch of the roof. The calculator will then give you the following; length of the diagonal segments, the interior measurements of the rise cuts and any other details requested.
How many rafters?
To be load bearing for the roofing materials you will be adding, roof truss are usually placed every two feet along the walls. This means you simply need to take the length of the wall and divide by two to see how many trusses you will need.
You are then ready to start cutting the wood you have bought to make your rafters. It is often best to leave 30cm or more at the end of each length to allow a little leeway for problems and a circular saw is often the best tool to cut with to ensure a regular finish.
When you are cutting the ridge beam, make certain to measure the height-above-plate (HAP) and mark it on the ridge. This is because it is important to account for the width of the wood from the diagonal rafters when measuring the ridge joint.
Special cuts
Plumb cuts are angled cuts made at the end of each truss once you have measured it. To make these cuts, a pencil, framing square and movable stair gauge is needed. Input the pitch of the roof that you calculated into the stair gauge then line it up with the pitch-end of the truss, marking with a pencil. You can then measure the seat cut this is where the diagonal rafter sits onto the wall.
Finally, you will need to measure bracing joints, depending on the style of roof you are creating. For a basic A-frame, there can be anywhere from four to eight, depending on the size of the roof and each one needs plumb cuts to work with the diagonal truss.
Finishing
Once all the wood is cut to the right size, it can be nailed together and metal bracing added to secure where needed. Gussets, or truss-plates, are ideal for this job and also reinforce the rafters. The final stage of the job is now to raise them to the roof and secure them in place, using extra bracing where necessary.
Reference URLs
http://en.wikipedia.org/wiki/Rafter
http://www.builderbill-diy-help.com/roof-framing.html
http://www.carpentry-pro-framer.com/Roof-Framing.html
https://www.youtube.com/watch?v=uaPhhQG1JPI
https://www.youtube.com/watch?v=Ym-9hM8uug4
Our Top Videos.

How to install a Velux Integra Electric Roof Window (5 Parts)
In this five-part guide, we take you through the full installation of a Velux GGU Centre Pivot Integra Roof Window onto an...

How to install a Duratech Centre-Pivot Pine Roof Window
Once you begin unpackaging the window, you’ll find in the box the brackets, the handle and the fixings. And there will also be some instructions...

How to install a Velux Centre-Pivot Roof Window (4 Parts)
In this four part guide, Mark Dymond – Velux Technician installs a Velux GGU Centre Pivot Roof Window onto an Interlocking Tile Roof...
Ideas & Advice
How-tos, tutorials and videos

How and why to use or snap a chalk line
Chalk lines are the fastest way to mark straight guidelines on flat surfaces. They are used extensively in the building and construction industry to speedily and accurately ‘draw’ straight lines between two points. Chalk lines are inexpensive tools...

Skylight Blinds: A Guide To The Different Types
Like many household product, blinds for skylight windows come in all shapes, sizes, and materials. Some are designed with a tangible purpose in mind, while others are more for show. One thing’s for sure - buying any type of skylight blind...

How Roof Shingles Are Made

How Roof Shingles Are Made

what is shingles on a roof?

Steve's Steals | Week 2 | Estwing Curved Claw Vinyl Hammers
£1 per ounce! Estwing Curved Claw Vinyl Handled Hammer.

Steve's Steals | Week 1 | Irwin Jack Handsaw 20" at only £2.50+VAT
Blimey £2.50+VAT for an Irwin Plus 880 Universal Jack Handsaw 20”/500mm, that really is a Steve’s Steal.